Step by step instructions on setting up the D-Link 655 C Model.
Familiarize yourself with the actual hardware before you begin supporting this equipment with clients.
Please select image below to access the desired emulator.

Before You Begin:
Look at the pictures bellow for reference.
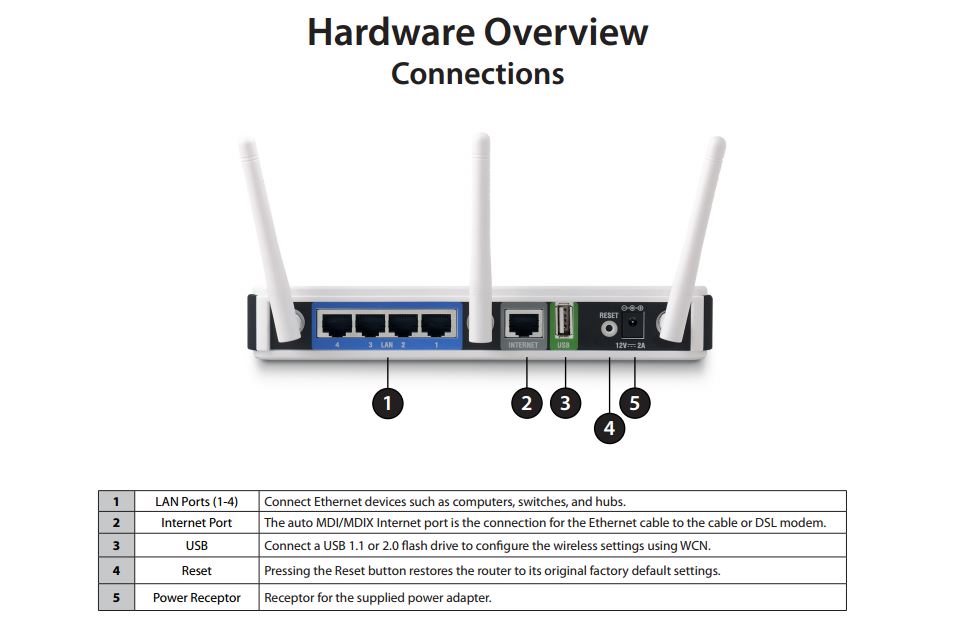
The back of the D-Link 655
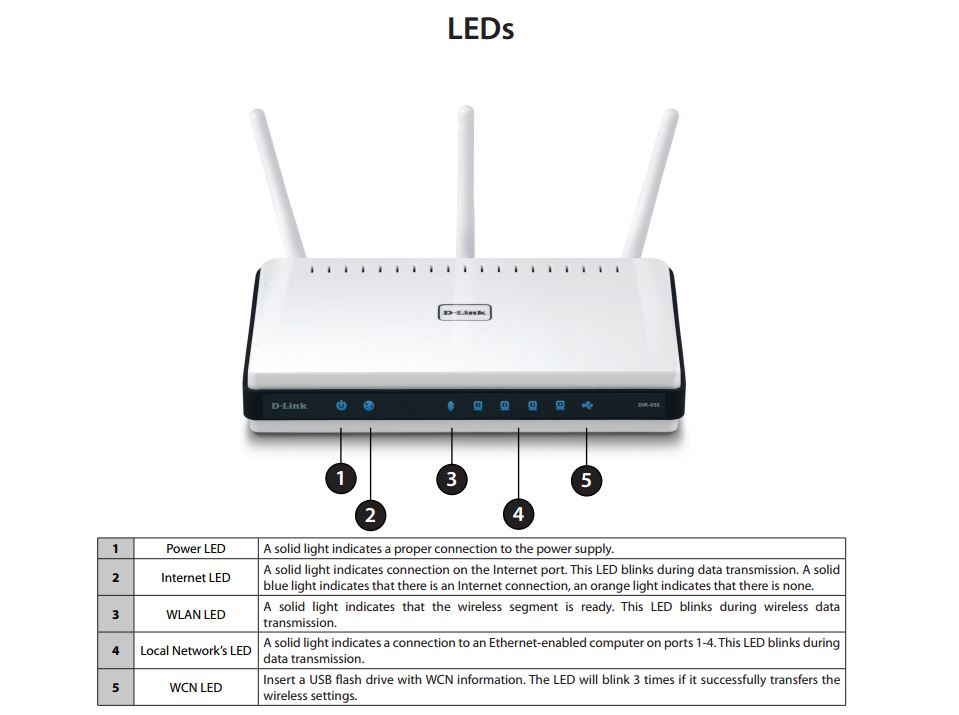
The front of the D-Link 655
Config Files for the D-Links QOS Settings:
You need to download the config files so you can setup the QOS Ports to increase security on the D-Link for the VoIP Phones.
D-Link DIR-655 (Rev B1) QoS Configuration File (older model)
D-Link DIR-655 (Rev C1) QoS Configuration File (newer model)
Wireless Installation Considerations:
Keep the number of walls and ceilings between the D-Link router and other network devices to a minimum – each wall or ceiling
can reduce your adapter’s range from 3-90 feet (1-30 meters.) Position your devices so that the number of walls or ceilings is
minimized.
Be aware of the direct line between network devices. A wall that is 1.5 feet thick (.5 meters), at a 45-degree angle appears to be
almost 3 feet (1 meter) thick. At a 2-degree angle it looks over 42 feet (14 meters) thick! Position devices so that the signal will
travel straight through a wall or ceiling (instead of at an angle) for better reception.
Building Materials make a difference. A solid metal door or aluminum studs may have a negative effect on range. Try to position
access points, wireless routers, and computers so that the signal passes through drywall or open doorways. Materials and objects
such as glass, steel, metal, walls with insulation, water (fish tanks), mirrors, file cabinets, brick, and concrete will degrade your
wireless signal.
Keep your product away (at least 3-6 feet or 1-2 meters) from electrical devices or appliances that generate RF noise.
If you are using 2.4GHz cordless phones or X-10 (wireless products such as ceiling fans, lights, and home security systems), your
wireless connection may degrade dramatically or drop completely. Make sure your 2.4GHz phone base is as far away from your
wireless devices as possible. The base transmits a signal even if the phone in not in use.
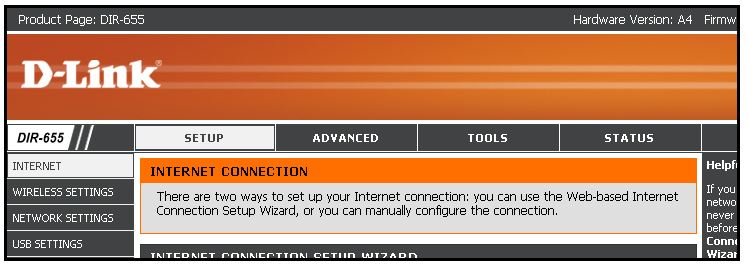
Web-based Configuration Utility:
- To access the configuration utility, open a web-browser such as Internet Explorer
and enter the IP address of the router (192.168.0.1).
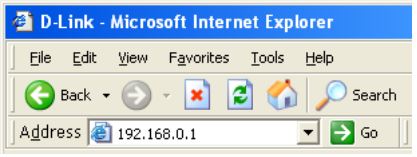
- You can also enter http://dlinkrouter to connect.
- Select Admin from the drop-down menu and then enter your password. The
password is left blank by default.
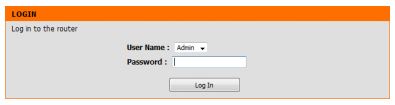
- You will need to change the password to the standard Admin password for the D-Link to “Yes0123” or the new password protocol for the routers to “Yes!0123”
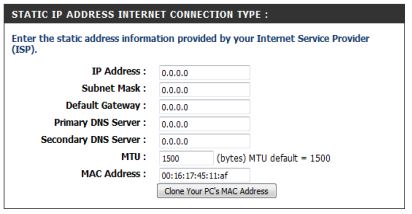
Manual Internet Setup Static IP:
Select Static IP Address if all the Internet port’s IP information is provided to you by the ISP. You will need to enter in the IP address, subnet mask, gateway address, and DNS address(es) provided to you by the ISP. Each IP address entered in the fields must be in the appropriate IP form, which are four octets separated by a dot (x.x.x.x). The Router will not accept the IP address if it is not in this format.
- IP Address: Enter the IP address assigned by the ISP.
- Subnet Mask: Enter the Subnet Mask assigned by the ISP.
- Default Gateway: Enter the Gateway assigned by the ISP.
- DNS Servers: The DNS server information will be supplied by the ISP but don’t use them. Use 8.8.8.8 – 8.8.4.4 instead.
- MTU: Maximum Transmission Unit – you may need to change the MTU for optimal performance with your specific ISP. 1500 is the default MTU.
- MAC Address: The default MAC Address is set to the Internet port’s physical interface MAC address on the Broadband Router. It is not recommended that you change the default MAC address unless required by your ISP. You can use the Clone Your PC’s MAC Address button to replace the Internet port’s MAC address with the MAC address of your Ethernet card.
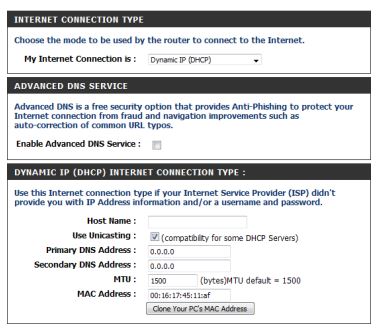
Dynamic IP
My Internet Connection: Select Dynamic IP (DHCP) to obtain IP Address information automatically from your ISP. Select this option if your ISP does not give you any IP numbers to use. This option is commonly used for cable modem services such as Comcast and Cox.
- Enable Advanced DNS Service: Advanced Domain Name System (DNS) services enhances your Internet performance by getting you the information and web pages you are looking for faster and more reliably. In addition, it improves your overall Internet experience by correcting many common typo mistakes automatically, taking you where you intended to go and saving you valuable time.
- Host Name: The Host Name is optional but may be required by some ISPs. Leave blank if you are not sure.
- Use Unicasting: Uncheck the box if you are having problems obtaining an IP address from your ISP
- Primary/Secondary DNS Server: Enter the Primary and secondary DNS server IP addresses assigned by your ISP. Type in the Google DNS Server IP Addresses 8.8.8.8 – 8.8.4.4
- MTU: Maximum Transmission Unit – you may need to change the MTU for optimal performance with your specific ISP. 1500 is the default MTU.
- MAC Address: The default MAC Address is set to the Internet port’s physical interface MAC address on the Broadband Router. It is not recommended that you change the default MAC address unless required by your ISP. You can use the Clone Your PC’s MAC Address button to replace the Internet port’s MAC address with the MAC address of your Ethernet card.
Manual Wireless Settings
- Enable Wireless: Check the box to enable the wireless function. If you do not want to use wireless, uncheck the box to disable all the wireless functions.
- Schedule: The schedule of time when the wireless settings rules will be enabled. The schedule may be set to Always, which will allow the particular service to always be enabled. You can create your own times in the Tools > Schedules section.
- Wireless Network Name: Service Set Identifier (SSID) is the name of your wireless network. Create a name using up to 32 characters. The SSID is case-sensitive.
- Enable Auto Channel Scan: The Auto Channel Scan setting can be selected to allow the DIR-655 to choose the channel with the least amount of interference.
- Wireless Channel: Indicates the channel setting for the DIR-655. By default the channel is set to 6. The Channel can be changed to fit the channel setting for an existing wireless network or to customize the wireless network. If you enable Auto Channel Scan, this option will be greyed out.
- 802.11 Mode: Select Mixed 802.11n and 802.11g – Select if you are using a mix of 802.11n and 11g wireless clients.
- Channel Width: Select the Channel Width: Auto 20/40 – This is the default setting. Select if using only 802.11n wireless clients
- Transmission Rate: Select the transmit rate. It is strongly suggested to select Best (Auto) for best performance.
- Visibility Status: Never select Invisible.
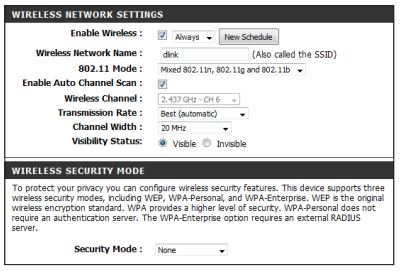
Wireless Security
What is WPA?
WPA, or Wi-Fi Protected Access, is a Wi-Fi standard that was designed to improve the security features of WEP (Wired Equivalent Privacy).
The 2 major improvements over WEP:
- Improved data encryption through the Temporal Key Integrity Protocol (TKIP). TKIP scrambles the keys using a hashing algorithm and, by adding an integrity-checking feature, ensures that the keys haven’t been tampered with. WPA2 is based on 802.11i and uses Advanced Encryption Standard (AES) instead of TKIP.
- User authentication, which is generally missing in WEP, through the extensible authentication protocol (EAP).
WEP regulates access to a wireless network based on a computer’s hardware-specific MAC address, which is relatively simple to be sniffed out and stolen.
EAP is built on a more secure public-key encryption system to ensure that only authorized network users can access the network.
WPA-PSK/WPA2-PSK uses a passphrase or key to authenticate your wireless connection.
The key is an alpha-numeric password between 8 and 63 characters long. The password can include symbols (!?*&_) and spaces. This key must be the exact same key entered on your wireless router or access point.
WPA/WPA2 incorporates user authentication through the Extensible Authentication Protocol (EAP). EAP is built on a more secure public key encryption system to ensure that only authorized network users can access the network.
CEG uses WPA2 for the Wi-Fi Authentication Protocol and the password needs to be the same on every D-Link for Yes Communities; 0738A9q11 or 0738A9q11!
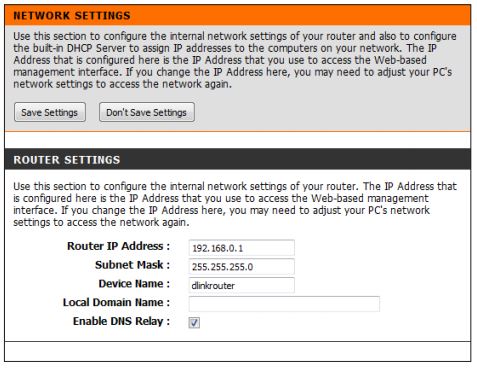
Network Settings
This section will allow you to change the local network settings of the router and to configure the DHCP settings.
IP Address: Enter the IP address of the router. The default IP address is 192.168.0.1.
If you change the IP address, once you click Apply, you will need to enter the new IP address in your browser to get back into the configuration utility.
Subnet Mask: Enter the Subnet Mask. The default subnet mask is 255.255.255.0
Local Domain: Enter the Domain name (Optional).
Enable DNS Relay: Uncheck the box to transfer the DNS server information from your ISP to your computers. If checked, your computers will use the router for a DNS server.
DHCP Server Settings:
What is DHCP?
DHCP stands for Dynamic Host Control Protocol.
The DIR-655 has a built-in DHCP server. The DHCP Server will automatically assign an IP address to the computers on the LAN/private network. Be sure to set your computers to be DHCP clients by setting their TCP/IP settings to “Obtain an IP Address Automatically.” When you turn your computers on, they will automatically load the proper TCP/IP settings provided by the DIR-655. The DHCP Server will automatically allocate an unused IP address from the IP address pool to the requesting computer. You must specify the starting and ending address of the IP address pool.
- Enable DHCP Server: Check this box to enable the DHCP server on your router. Uncheck to disable this function.
- DHCP IP Address Range: Enter the starting and ending IP addresses for the DHCP server’s IP assignment.
Note: If you statically (manually) assign IP addresses to your computers or devices, make sure the IP addresses are outside of this range or you may have an IP conflict.
- DHCP Lease Time: The length of time for the IP address lease. Enter the Lease time in minutes.
- Always Broadcast: Enable this feature to broadcast your networks DHCP server to LAN/WLAN clients.
- NetBIOS Announcement: NetBIOS allows LAN hosts to discover all other computers within the network, enable this feature to allow the DHCP Server to offer NetBIOS configuration settings.
- Learn NetBIOS from WAN: Enable this feature to allow WINS information to be learned from the WAN side, disable to allow manual configuration.
- NetBIOS Scope: This feature allows the configuration of a NetBIOS ‘domain’ name under which network hosts operates. This setting has no effect if the ‘Learn NetBIOS information from WAN’ is activated.”
- NetBIOS Mode Type: Select the different type of NetBIOS node: Broadcast only, Point-to-Point, Mixed-mode, and Hybrid.
- Primary/Secondary WINS IP Address: Enter your Primary (and Secondary) WINS IP address(es).

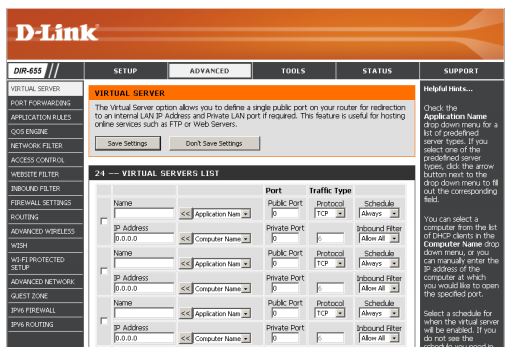
Virtual Server
The DIR-655 is also capable of port-redirection meaning incoming traffic to a particular port may be redirected to a different port on the server computer in this case it is for the phones.
- Name: Enter a name for the rule or select an application from the drop-down menu. Select an application and click << to populate the fields.
- IP Address: Enter the IP address of the computer on your local network that you want to allow the incoming service to. If your computer is receiving an IP address automatically from the router (DHCP), you computer will be listed in the “Computer Name” drop-down menu. Select your computer and click <<.
- Private Port/ Public Port: Enter the port that you want to open next to Private Port and Public Port. The private and public ports are usually the same. The public port is the port seen from the Internet side, and the private port is the port being used by the application on the computer within your local network.
- Protocol Type: Select TCP, UDP, or Both from the drop-down menu.
- Inbound Filter: Select Allow All (most common) or a created Inbound filter. You may create your own inbound filters in the Advanced > Inbound Filter page.
- Schedule: The schedule of time when the Virtual Server Rule will be enabled. The schedule may be set to Always, which will allow the particular service to always be enabled. You can create your own times in the Tools > Schedules section.
DIR-655 Emulator for CEG Support Staff
Click on picture to go to emulator for the D-Link 655